Configure an Ansible testing system on Windows (Part 2)
In the first entry of this series, we configured Vagrant and VirtualBox to deploy a pair of basic Windows 2012 R2 virtual machines. We built our basic inventory for Ansible and verified we could connect to our newly created virtual machines. Now we can get onto the real work - developing Ansible playbooks.
Creating our common role
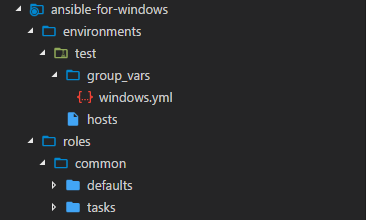
The first playbook files we will create are related to our common role for windows. Essentially these are features we are going to want available on every managed system such as latest version of PowerShell. First let's create the folder structure for our common role; create the roles folder and subfolders shown below:

In the roles/common/tasks folder create a main.yml file. The first tasks we will add to this role will install the latest version of Powershell using the chocolatey package manager. Since our host doesn't have chocolatey installed, Ansible will also automatically install it. Add the following task to the file:
# The latest powershell gives us most functionality
- name: Make sure Windows Management Framework and PowerShell is latest version
  win_chocolatey:
     name: powershell
     state: latest
  register: check_powershell5
  become: yes
  become_method: runas
When we run this later, you may get a warning about the use of the runas method if you are using Ansible 2.4 due to this method being experimental. It can safely be ignored.
The 5th line register function creates an Ansible variable that stores the results of the chocolatey task which we can use to determine what to do on later steps. Upgrading WMF requires that we reboot the system. So we will check to see if our Powershell5 task resulted in a change and reboot the server before continuing. Add the following task below the first one to our common role:
# Powershell 5.0 requires a reboot, so lets get it done if it's needed.
- name: Reboot to complete Powershell 5.0 install
  win_reboot:
    shutdown_timeout: 600
    reboot_timeout: 600
    post_reboot_delay: 120
  when: check_powershell5.changed
This shutdown gives windows plenty of time - 10 minutes to shutdown, 10 minutes to reboot, followed by a 2 minute delay after boot.
If you haven't already, save the file. Now we will create the domain controller role playbook and add the common role to it for testing. In the top level folder ( C:\source\ansible-for-windows\ ) create a file called domain_controllers.yml. In it, we will tell Ansible to run the playbook against the members of our [domain_controllers] group in inventory and to include the common role.
---
- name: CONTOSO.com Domain Controller configuration
  hosts: domain_controllers

  roles:
  - { role: common }
Now since we are using the become_method: runas in our PowerShell step, we need a few extra variables defined to support this. In roles\common\defaults create main.yml and add the following values to the file:
# default user for using become: runas method
# used for installing Powershell 5.0 in this role.
ansible_become_password: vagrant
ansible_become_user: vagrant
Save the file and we can now execute our first windows playbook by typing the following command into bash:
ansible-playbook domain_controller.yml -i environments/test/hosts
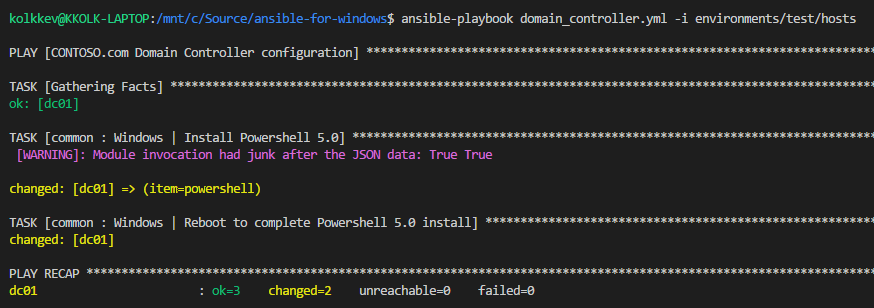
This will execute our playbook and assuming everything is in order you should see this output:

Worked great, but no configuration is ever truly complete, so let's modify our common role to include enabling Remote Desktop Protocol on this host. To do this we will take advantage of Windows Powershell Desired State Configuration, which is very powerful when used in conjunction with Ansible using the win_dsc module. Before we can use a particular DSC module we need to the module available, luckily we can use the win_psmodule to make sure these modules are installed.
To get this setup edit the roles/common/tasks/main.yml and expand it to also complete this task by adding the following steps after our reboot for Powershell 5.0 install step:
#
# Enable Remote Desktop
#

- name: Windows | Check for xRemoteDesktopAdmin Powershell module
  win_psmodule:
    name: xRemoteDesktopAdmin
    state: present

- name: Windows | Enable Remote Desktop
  win_dsc:
    resource_name: xRemoteDesktopAdmin
    Ensure: present
    UserAuthentication: Secure

- name: Windows | Check for xNetworking Powershell module
  win_psmodule:
    name: xNetworking
    state: present

- name: Firewall | Allow RDP through Firewall
  win_dsc:
    resource_name: xFirewall
    Name: "Administrator access for RDP (TCP-In)"
    Ensure: present
    Enabled: True
    Profile: "Domain"
    Direction: "Inbound"
    Localport: "3389"
    Protocol: "TCP"
    Description: "Opens the listener port for RDP"
These steps are pretty straight forward. We make sure the Powershell DSC module we are going to use to configure RDP is available, then use it to enable RDP. However, since the firewall is on by default in Windows Server 2012 R2 we also need to make sure the RDP listener port is open which we used the xNetworking module to take care of. Ansible makes working with Powershell DSC very straight forward, compare the values we're passing to the module with the ones documented for xFirewall.
ansible-playbook domain_controller.yml -i environments/test/hosts
# Make sure our hostname matches the inventory and isn't still the value from vagrant template
- name: Change hostname to match inventory
  win_domain_membership:
    hostname: ""
    domain_admin_user: ""
    domain_admin_password: ""
    workgroup_name: WORKGROUP
    state: workgroup
  register: name_state

- name: Reboot to complete name change
  when: name_state.changed
  win_reboot:
    shutdown_timeout: 600
    reboot_timeout: 600
    post_reboot_delay: 120
when: ansible_env.COMPUTERNAME != inventory_hostname|upper